ProSelect
Test Driving The Awesome New Tools In ProSelect 4
September/24/2008
If you haven't upgraded to ProsSelect Version 4 yet, PLEASE don't go through the upcoming prime-time portrait season without doing so! It won't take long to master the fabulous new sales tools included in this upgrade. In fact the first thing that I did when I had a few days at home was to begin working with two of the features that make this upgrade worth its weight in gold . . . gold that will find its way directly into your pocket.
The expanded Apply Custom Effect feature is one of the best sales-building time-savers out there; it allows you to apply your favorite Photoshop Actions to selected images with a simple mouse click; then, after the sale, those actions can be applied automatically to your RAW or jpg file when you do your Photoshop processing through ProSelect. This is a great time-saver.
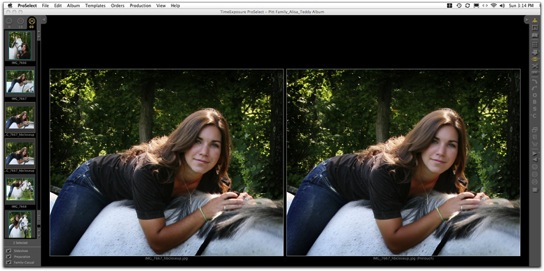
I have always taken issue with those who insist on laboriously "pretouching" every preview image. But I was thrilled when I learned from Ron Nichols how quickly you can pretouch using the Imagenomic Portraiture plugin. I have previously posted Ron's movie on that subject, and you can still view it by clicking here. As Ron explains, you can download a bunch of really helpful actions from his website, but you must own Imagenomic's Portriature plug-in to activate his four Pretouch PS Actions in ProSelect. If you don't own it already, you can save 20% by using Ron's RNDS07 code when you order. The action and the plug-in are terrific because they do their softening only on skin, so the image does not become mushy or over-softened. In the example below, the image on the left is shown as it came out of the camera, and at right it is just slightly softened by Ron's lowest-level Pretouch Action.
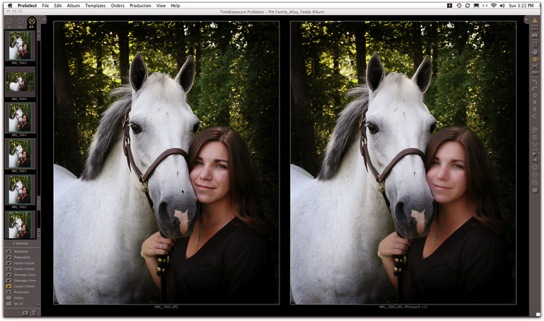
In the following example, the image at left is untouched, and I dialed up the softening a bit on the right by using Ron's Pretouch+1Action.
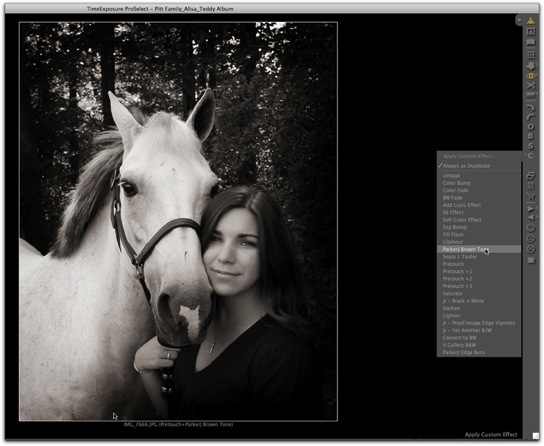
The Custom Effects feature has been part of ProSelect since I first began using it, but there were only 5 slots for Photoshop Actions, so I didn't pay much attention to it. Now that the capacity has expanded to 25 slots, and the Action-loading process is simplified to a drag-and-drop procedure, I'm having a ball with it, and I'm saving a lot of time in prepping images. If I need a little exposure bump or to lighten or darken and image or an image group, I just click on an Action, and the job is done instantly! I've also added some of my favorite effects such as this ParkerJ Brown Tone from Parker Pfister's outstanding set of PS Actions.
I couldn't wait to try the new Room View feature, and what I found out is that when it is combined with the upgraded Layouts section and Frames feature, ProSelect now offers a world of possibilities for showing images in room settings with frames around them — including composites that you can design as a template, then process automatically in Photoshop through the time-saving ProSelect Production module. When completed, the images are ready to send on to your lab for output.
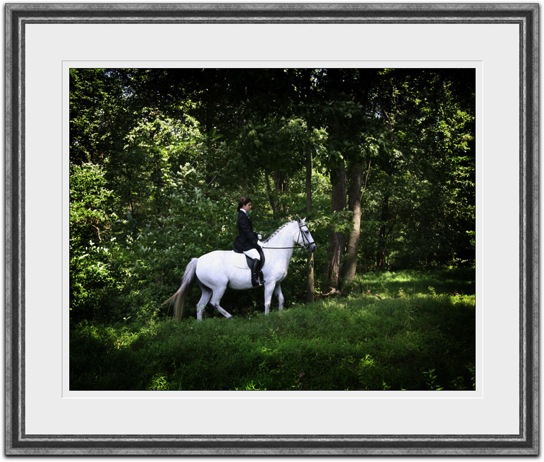
I began the learning process by working with a large number of images from a very complicated session involving numerous pose groupings that easily could become a confusing sales nightmare, both for me and for the client. The lengthy session involved the daughter of long-time friends of ours; she was about to leave for college, accompanied by her dressage horse. Her parents felt that now was the perfect time for casual and formal portraits of her with the pony, as well as for a family portrait in the woods. Even with Jim and me working together to control and direct the horse, I knew we would generate many more images from this session than usual. So I was determined to make use of ProSelect's new presentation tools to help pull together this difficult presentation. As a business instructor, I am continually dismayed by how chronic over-shooters compound their felony by putting images online, expecting their clients to determine which images to choose and how to display them, without any help from the photographer who created them. In my opinion this is both lazy and unprofessional. Clients want and need your guidance, and they value your opinion.
One of the ProSelect Version 4 features that is easiest to implement is the ability to add frames to images without mats . . .
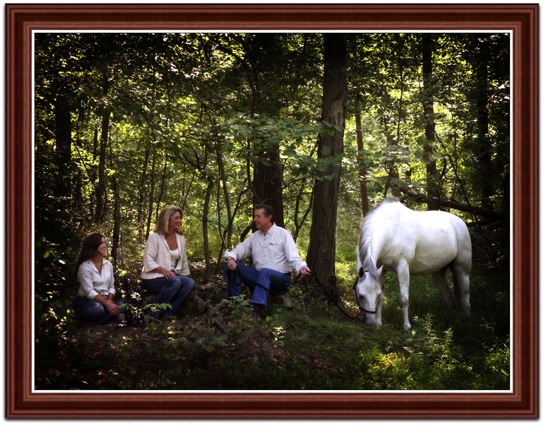
. . . or you can just as easily show a matted image displayed inside the frame of your choice. The application comes with several sizes of stock frames, or you can add photographs of your favorite frames. You can even add color and dimension to mats that can be output as virtual mats, along with their images, through ProSelect Production.
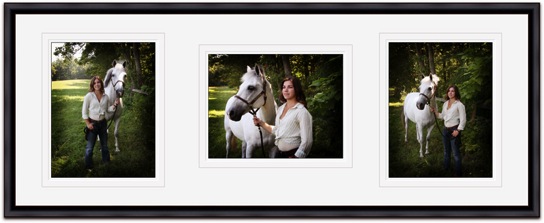
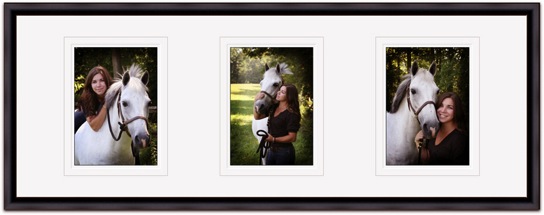
From the time that Layouts were introduced in ProSelect, I have found this feature to be a wonderful way to present secondary images in composites that literally sell themselves. Being able to add frames to these sets puts the icing on the cake!
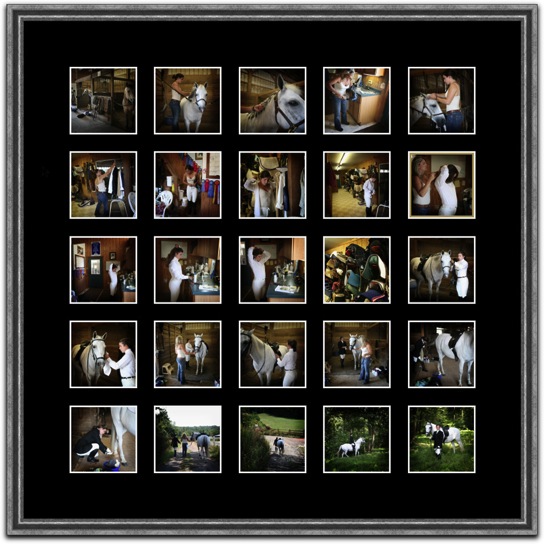
Rather than just stand around while my subject was preparing herself and her mount for a formal dressage portrait, I decided to record the lengthy step-by-step preparation process with an eye toward creating a photojournalistic product. Of course there's always the possibility of creating a book from such images, but I finally decided to present the family with the option of a framed composite. It took me only a matter of minutes to build a 25-pose 30x30-inch composite, which I can process through ProSelect's Production module and send on to the lab.
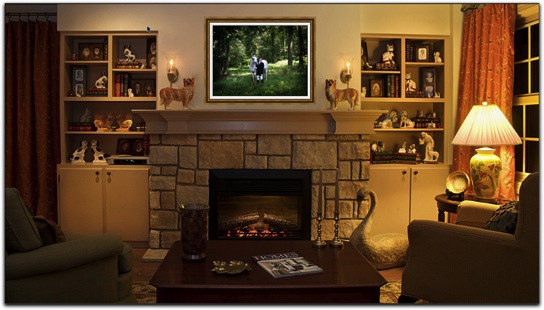
The aspect of ProSelect 4 that I most anticipated was being able to show a featured image through the new Room Views tool. I learned how it worked by using a photo of my own living room fireplace, discovering how easy it is not only to show clients various sizes of the image over the mantle, but also the impact difference between the two images that I plan to suggest would be the best options for their primary wall portrait. This way they can actually see the decorative effect of the casual pose . . .
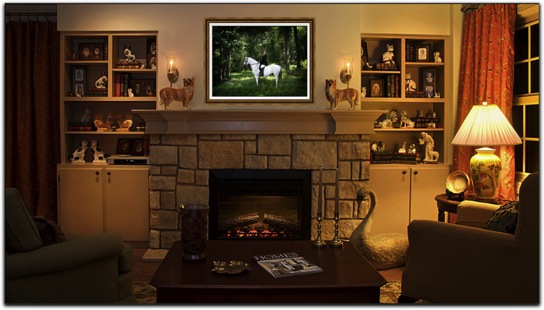
. . . versus the effect of the more formal one.
Now that I've mastered this feature, I've decided to visit the client's home and photograph their available display areas so that they can make a truly informed choice about their purchase. Honestly, these tools can make the sales process an absolute pleasure when you take the time to organize the images intelligently and with the needs of the client in mind.
While ProSelect comes with an excellent User Guide, I would recommend getting started on the learning curve by viewing the resource movies provided on the ProSelect TimeExposure.com website. Click here to get to a log-in page where you can view ProSelect Tutorial Movies. I strongly suggest that you view each of the movies in the Advanced list before you start using the application's new features. Another helpful movie that shows many of these features is one created by Ron Nichols, which I previously posted. Ron does not sell by recommendation the way I do, but you will learn a lot about both ProSelect and his sales process by clicking here.
I know that some ProSelect users still don't know how easy it is to create a downloadable slideshow through ProSelect: It's simply a matter of preparing your slide show and hitting the Export/Quicktime Slideshow command. You can see the show that I will be presenting to the family after we get back from our upcoming trip to Ireland below:
To ProSelect developer Peter Howlett and his photographer wife Fran over in Perth, Australia, a great big THANK YOU for continuing to help photographers worldwide to benefit from maximizing our sales and satisfying our clients.
Cheers!
The expanded Apply Custom Effect feature is one of the best sales-building time-savers out there; it allows you to apply your favorite Photoshop Actions to selected images with a simple mouse click; then, after the sale, those actions can be applied automatically to your RAW or jpg file when you do your Photoshop processing through ProSelect. This is a great time-saver.
I have always taken issue with those who insist on laboriously "pretouching" every preview image. But I was thrilled when I learned from Ron Nichols how quickly you can pretouch using the Imagenomic Portraiture plugin. I have previously posted Ron's movie on that subject, and you can still view it by clicking here. As Ron explains, you can download a bunch of really helpful actions from his website, but you must own Imagenomic's Portriature plug-in to activate his four Pretouch PS Actions in ProSelect. If you don't own it already, you can save 20% by using Ron's RNDS07 code when you order. The action and the plug-in are terrific because they do their softening only on skin, so the image does not become mushy or over-softened. In the example below, the image on the left is shown as it came out of the camera, and at right it is just slightly softened by Ron's lowest-level Pretouch Action.
In the following example, the image at left is untouched, and I dialed up the softening a bit on the right by using Ron's Pretouch+1Action.
The Custom Effects feature has been part of ProSelect since I first began using it, but there were only 5 slots for Photoshop Actions, so I didn't pay much attention to it. Now that the capacity has expanded to 25 slots, and the Action-loading process is simplified to a drag-and-drop procedure, I'm having a ball with it, and I'm saving a lot of time in prepping images. If I need a little exposure bump or to lighten or darken and image or an image group, I just click on an Action, and the job is done instantly! I've also added some of my favorite effects such as this ParkerJ Brown Tone from Parker Pfister's outstanding set of PS Actions.
I couldn't wait to try the new Room View feature, and what I found out is that when it is combined with the upgraded Layouts section and Frames feature, ProSelect now offers a world of possibilities for showing images in room settings with frames around them — including composites that you can design as a template, then process automatically in Photoshop through the time-saving ProSelect Production module. When completed, the images are ready to send on to your lab for output.
I began the learning process by working with a large number of images from a very complicated session involving numerous pose groupings that easily could become a confusing sales nightmare, both for me and for the client. The lengthy session involved the daughter of long-time friends of ours; she was about to leave for college, accompanied by her dressage horse. Her parents felt that now was the perfect time for casual and formal portraits of her with the pony, as well as for a family portrait in the woods. Even with Jim and me working together to control and direct the horse, I knew we would generate many more images from this session than usual. So I was determined to make use of ProSelect's new presentation tools to help pull together this difficult presentation. As a business instructor, I am continually dismayed by how chronic over-shooters compound their felony by putting images online, expecting their clients to determine which images to choose and how to display them, without any help from the photographer who created them. In my opinion this is both lazy and unprofessional. Clients want and need your guidance, and they value your opinion.
One of the ProSelect Version 4 features that is easiest to implement is the ability to add frames to images without mats . . .
. . . or you can just as easily show a matted image displayed inside the frame of your choice. The application comes with several sizes of stock frames, or you can add photographs of your favorite frames. You can even add color and dimension to mats that can be output as virtual mats, along with their images, through ProSelect Production.
From the time that Layouts were introduced in ProSelect, I have found this feature to be a wonderful way to present secondary images in composites that literally sell themselves. Being able to add frames to these sets puts the icing on the cake!
Rather than just stand around while my subject was preparing herself and her mount for a formal dressage portrait, I decided to record the lengthy step-by-step preparation process with an eye toward creating a photojournalistic product. Of course there's always the possibility of creating a book from such images, but I finally decided to present the family with the option of a framed composite. It took me only a matter of minutes to build a 25-pose 30x30-inch composite, which I can process through ProSelect's Production module and send on to the lab.
The aspect of ProSelect 4 that I most anticipated was being able to show a featured image through the new Room Views tool. I learned how it worked by using a photo of my own living room fireplace, discovering how easy it is not only to show clients various sizes of the image over the mantle, but also the impact difference between the two images that I plan to suggest would be the best options for their primary wall portrait. This way they can actually see the decorative effect of the casual pose . . .
. . . versus the effect of the more formal one.
Now that I've mastered this feature, I've decided to visit the client's home and photograph their available display areas so that they can make a truly informed choice about their purchase. Honestly, these tools can make the sales process an absolute pleasure when you take the time to organize the images intelligently and with the needs of the client in mind.
While ProSelect comes with an excellent User Guide, I would recommend getting started on the learning curve by viewing the resource movies provided on the ProSelect TimeExposure.com website. Click here to get to a log-in page where you can view ProSelect Tutorial Movies. I strongly suggest that you view each of the movies in the Advanced list before you start using the application's new features. Another helpful movie that shows many of these features is one created by Ron Nichols, which I previously posted. Ron does not sell by recommendation the way I do, but you will learn a lot about both ProSelect and his sales process by clicking here.
I know that some ProSelect users still don't know how easy it is to create a downloadable slideshow through ProSelect: It's simply a matter of preparing your slide show and hitting the Export/Quicktime Slideshow command. You can see the show that I will be presenting to the family after we get back from our upcoming trip to Ireland below:
To ProSelect developer Peter Howlett and his photographer wife Fran over in Perth, Australia, a great big THANK YOU for continuing to help photographers worldwide to benefit from maximizing our sales and satisfying our clients.
Cheers!
0 Comments
Don't Miss This Great ProSelect Tutorial
July/02/2008
I want to thank Ron Nichols for sending me a link to his website where you can review an excellent ProSelect sales tutorial in which he takes you through the entire sales process using ProSelect, the incredible application that so many photographers recognize to be an indispensible sales tool. Ron really knows what he's talking about when it comes to maximizing sales and how to use ProSelect efficiently for both sales and workflow. Even if you're already using ProSelect, you'll benefit from seeing Ron's approach to sales and the organization of his salesroom environment, and you'll probably learn some ProSelect shortcuts and features that you might not know exist. Just click on this link to view the tutorial.
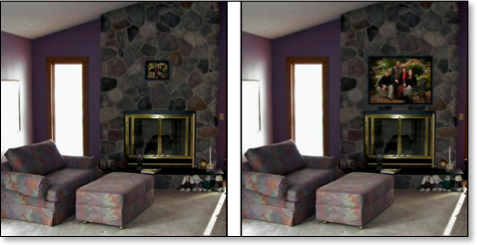
In it you'll see two of the great new features of ProSelect version 4.0, the ability to place frames around images, and the new "Room View" capability that allows you to show the client's framed image choice within a photograph of the room in which clients plan to display it. Or you can project it within your choice of a room setting such as above a fireplace or couch. These features add even more tools to help your clients make appropriate selections of their portrait images, as they can compare the impact of a properly sized image, such as the 30x40 portrait shown below at right, compared to the same image shown in 11x14 size at left.
While you're on Ron's site, take a look at his outstanding palette tools that increase your workflow speed and artistic ability. They have been absolutely instrumental to the improvement of my digital skills.
Spice Up Your Workflow by Pretouching in ProSelect
November/29/2007
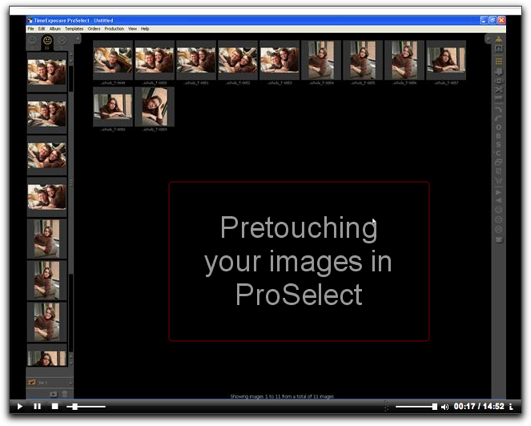
If you are a ProSelect user who is not taking advantage of the software's Apply Custom Effects feature (the C icon on the right-hand tool bar), then you need to stop what you're doing NOW and click on this video link that I just received from Ron Nichols at Ron Nichols Digital Solutions. It will take you to a really helpful, short video tutorial. I'm embarrassed to admit that I've haven't taken the time to learn how to use this fantastic feature . . . that is until I saw Ron's video and realized how EASY it is to activate and how much benefit you receive by installing Imagenomic's Portraiture plug-in for "pretouching" your images in ProSelect. I even own the Portraiture filter, but have been using it independent of ProSelect. If you haven't seen it, Portraiture is just fantastic for pretouching and as a diffusion tool in retouching. There's a sizable discount code available in Ron's video, so be on the lookout for it.
So why pretouch through ProSelect? In a matter of seconds, you'll have faces and blemishes on any other areas of skin (such as "diaper designs" on babies) looking so much better in your projection sales presentation, and you won't have to do time-consuming retouching. Pretouching also is great if you are printing proof pages or even exporting images for an iPod slide show. What's more, you can enable the pretouching (and any other actions you run through Proselect) to carry through to finished prints by using ProSelect's integrated Production module. I don't do much production in-house, but when I have to do my own printing of client work, I use ProSelect from start to finish, and it is SO slick!
When I learned from the video how easy it is to add actions to ProSelect, I immediately added some that Ron provides at no charge on his site. Download instructions are on the video. I particularly like the "Glamour" filter. It's great for seniors, and I also intend to use it for a new line of . . . believe it or not . . . Glamour-Pet Portraits. I hope to create some samples on Saturday, so the video came just in time.
Of course now that I know how to add actions, I want to add ALL my favorite actions; however at present ProSelect has only 5 Apply Custom Effects slots. But not to worry: Ron tells me that the new ProSelect upgrade, which is now in beta testing, has many more slots available. Wow I can't wait!
I'll be amazed if you are not impressed by this wonderful ProSelect feature, so give it a try, and let me know how it goes!
My Son's Wedding Movie
June/22/2007
This time last year my family and I were returning from a cruise to Alaska, where my son and his long-time fiancee were married by the captain aboard ship. Back in April I did a blog entry about how easy it was to create wedding album or book layouts using Proselect. Somehow I didn't even think about creating a movie of the album . . . too much going on at the time. Once I did think about it, I assumed that it would be a big deal to create the movie. Boy I wrong!
I had already created a slide show by importing the single page files I had created through the ProSelect Production module back into ProSelect. As you can see from the image below, I added blank pages at the beginning and end and created a closing technique by taking the last image and making a black-and-white dissolve into a sepia version and finally into a color version. I did this to allow the music to begin and end where I wanted it.
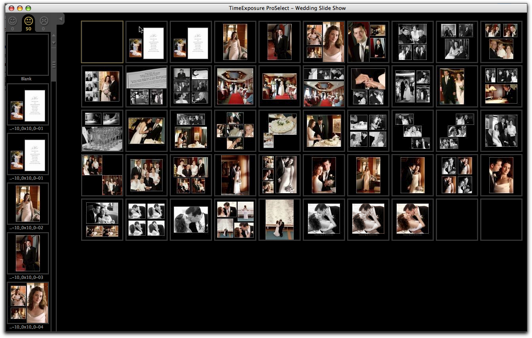
So all I had to do to create the movie was go the File menu and pull down to Export >Quicktime Slide Show. That brought up the dialog box that you see below with the selections I made.
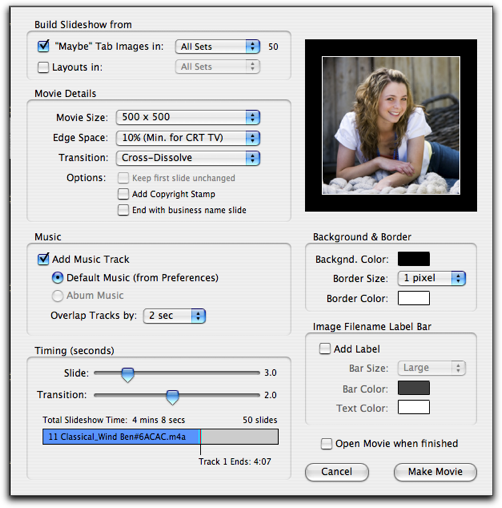
That's all there was to it! You can check out the QT movie below.
I had already created a slide show by importing the single page files I had created through the ProSelect Production module back into ProSelect. As you can see from the image below, I added blank pages at the beginning and end and created a closing technique by taking the last image and making a black-and-white dissolve into a sepia version and finally into a color version. I did this to allow the music to begin and end where I wanted it.
So all I had to do to create the movie was go the File menu and pull down to Export >Quicktime Slide Show. That brought up the dialog box that you see below with the selections I made.
That's all there was to it! You can check out the QT movie below.
Learn ProSelect Inside and Out!
May/28/2007

Here's some great news for those who want to take advantage of the many benefits of ProSelect, the leading sales and production software for portrait wedding studios: Digital workflow guru Ron Nichols has teamed up with the makers of ProSelect to produce a Video Tutorial Palette that helps you instantly understand the software's power as a time-saving, profit-building workflow management tool.
Ron Nichol's ProSelect Training Palette resides on your desktop as a quick reference, providing you with access to over 30 video chapters. Each presents click-by-click instruction by Ron, who not only shows you how to do it, he also explains how to apply it in real-life situations.
Ron has gained industry-wide acclaim for his innovative palette concept that allows you to dive right into and take control of a software such as Photoshop or to make use of techniques developed by some of the industry's leading photographers.
If you haven't already seen or purchased Ron's fantastic Production Retouching Palette, you can learn about it by clicking here to view a movie that explains how the palette takes the complexity out of Photoshop by controling brush dynamics, adjusting blending modes and opacities, managing layers, and providing step-by-step video instruction. All you do is follow Ron's instructions, and Photoshop retouching becomes a simple matter of double-clicking, then painting. I can't say enough good things about this superb product!
Inside ProSelect
May/18/2007
It was such a pleasure to have Fran Howlett attend my February Guerrilla Management Workshop in Fredericksburg, VA. Fran and her husband Peter, developers of ProSelect, had come from Australia to participate in the Imaging USA trade show in San Antonio and do some skiing out west. Fran decided to stay on for the workshop after Peter headed home. She was kind enough to present a demonstration of the software to the class, and she also provided us with handouts, which she has given permission for me to post here. I think you'll find them to be helpful.
The first download will increase your understanding of the many functions of ProSelect. Fran tells me that most users really don't know how many different functions ProSelect accomplishes, so she has listed them—menu by menu—so that you can easily scan what they are.
The second download is a description of the ProSelect workflow that Fran uses in her portrait studio in Perth. I found it really helpful to know how the originators of this enormously helpful program use it to its best advantage.
Thanks, Fran!
Using ProSelect for Album & Marathon Book Layouts
April/28/2007
Last July my son and his long-time fiancee finally got married. Although they had been together since college, the decision tie the knot on PPA's first-ever cruise event was very much a spur-of-the-moment decision. My son Wes heard his dad and me talking about our going on the cruise, and he figured this would be as good a time and place as any to make it official. Jess agreed, so on July 10, 2006, Wes and Jess were married aboard ship, with family members and a bunch of photographer friends in attendance.
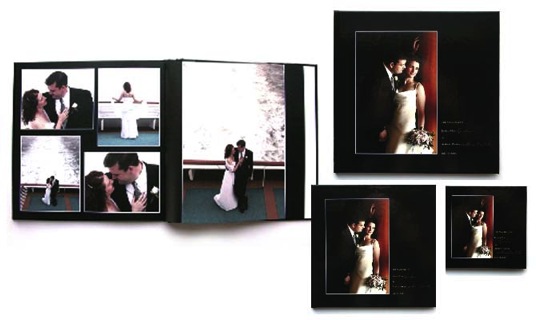
We were extremely fortunate that award-winning wedding photographers Jamie Hayes and Mary Fisk-Taylor offered to cover the wedding. Their photos were awesome, but at first it was a daunting task for me to put an album together, as I hadn't built a wedding album in many, many years. Then I remembered that one of my SMS Clients, Parker Smith of Atlanta, had told me he uses ProSelect to create layouts that he outputs for albums. So Parker gave me some tips and I read ProSelect's handy user guide and discovered how easy it is to quickly design your own layouts, add the images, then output them through the software's production module. What really amazed me was that I negotiated the learning curve and had 44 pages completed within less than a day.
Since the bride and groom really didn't want a traditional album, I decided to try to upload the files to Marathon Press to create a hard-bound book from their new Premiere Editions series. Again, the process was incredibly easy, and less than two weeks later I received a 10x10 illustrated-cover hard-bound book for the bride and groom, 8x8 books for the parents, and several nice purse-size 5x5s. To learn more about Marathon Premiere Edition books, click here.
The entire process was so much fun and the books so attractive and inexpensive that I intend to start rounding up all of my family portraits and vacation images that are stuck in drawers, bulky albums, and who-knows-where else, and create a library of books that will take up so much less space and be fun for my family to enjoy.
Meet Peter and Fran Howlett
April/08/2007